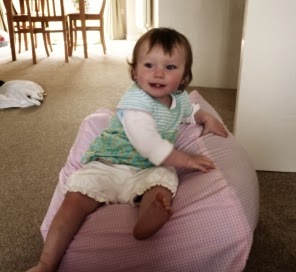
I designed and made this bean bag chair for my little girl after seeing one in the JoJo Mama Bebe catalogue for £45.
It was pretty easy to make and I'm actually surprised how much my 1 year old likes it. She flops down onto it and even sits on it like she's meant to! Now she's outgrown her bouncy chair this makes a good place for her to chillax.
Hopefully you can see from the images below the bean bag is shaped (not just a bag shape) so for small babies it can be used like a baby nest bed, and for toddlers as a shaped chair.


- 2m of fabric
- A sewing machine, thread and pins
- A pen
- A scissors
- A ruler
- A bean bag net (search ebay or amazon, they are about £1.50)
- 1-1.5 cubic feet of beans
The bean bag net is a safety measure so that all the beans are contained within a net within the fabric cover. This means that if a seam splits beans won't go everywhere (particularly important if it's for a toddler who might eat them!). It also means that the fabric cover can be made removable so that it can be washed.
What to do...

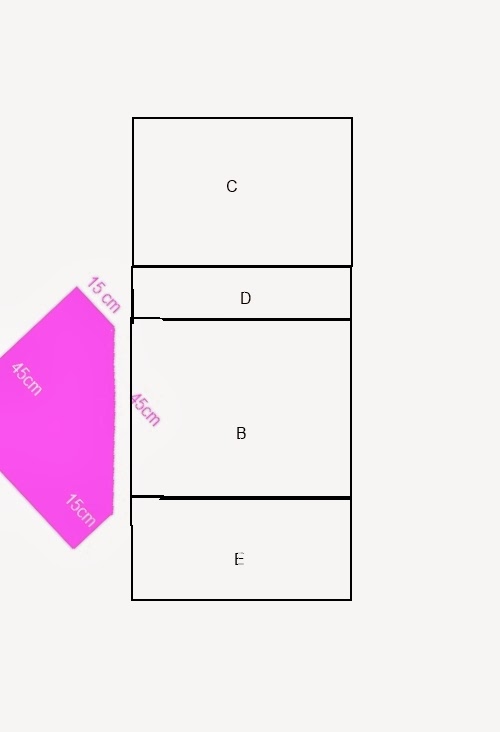
1. Draw out two sides and then cut around them approx 1cm from the line. Mark this piece (A)
2. Draw a piece 45cm by 45cm and the cut 1cm from the line (seat part). Mark this piece (B)
3. Draw a piece 70cm by 45cm and then cut 1cm from the line (back and half of base) Mark this piece. (C)
3. Draw a piece 45cm by 15cm and then cut 1cm from the line (top of seat) Mark this piece. (D)
4. Draw a piece 45cm by 40cm and then cut 1cm from the line (front panel and half of base). Mark this piece (E)

5. Start with pieces C and D. With right sides facing, pin the two pieces together along one of the edges (that are the same length). Then sew along the pencil line.
6. Continuing with this piece, create a 1cm hem on the top edge (edge opposite the one you've just sewed onto piece D) of piece C.
7. Next with right sides facing, pin the piece you are working on (C&D) to B and then sew along the pencil line.
8. Repeat this with piece E.
9. Finally hem the bottom edge of piece E. (The two hemed edges will come together to make an envelope in the end)
10. With right sides facing, pin the diagonal edge of A to B, then stitch along the line.
11. Next pin the 15cm edge to D and sew
12. Then the other 15cm edge to E and sew. E will also reach part way onto the base (But don't sew this yet as it will make doing the other side harder)
13. From the diagram you should be able to see how piece C will now fold and sew down the side - C is long enough to also reach part way across the base (But don't sew this bit yet or it will make doing the other side harder)
14. Repeat from step 10 on the other side.
15. Now go back and finish off the base. Sew all the way to the hem on piece E, and up to the same point on piece C, this will leave a flap on piece C that will tuck under piece E when the bag is complete (think envelope or pillow case)
16. Repeat on the other side.
17. Turn the bag the right way out and shake.
16. Repeat on the other side.
17. Turn the bag the right way out and shake.
18. Tip the beans into the net. (I'd suggest doing this in the garden as it is not as easy as you'd expect - the static makes them stick to everything!)
19. Put the cover onto the bean net and make sure the flaps are on the base and closed
20. Watch your little one sit, climb, lie and play on their new bean bag chair. x
19. Put the cover onto the bean net and make sure the flaps are on the base and closed
20. Watch your little one sit, climb, lie and play on their new bean bag chair. x
No comments:
Post a Comment